Mold and mildew are the unwelcome houseguests that no one invited—but they love to crash in your bathroom anyway. Despite what popular belief might say, these fungal intruders don’t magically appear just because your shower is used every day. Instead, they thrive in damp, humid environments where ventilation is poor, and they often latch onto porous surfaces like drywall or grout. Before you know it, you’re dealing with mold in the bathroom, which can create an unsightly, and sometimes unhealthy, situation for you and your family.
As a local, family-run plumbing company serving St. John’s County, Jacksonville, St. Augustine, and the surrounding areas, we at Kingdom Based Plumbing know all too well how pesky mold and mildew can be—especially in our warm, humid Florida climate. We understand that bathrooms are prime breeding grounds for mold, given the moisture and steam that accumulate there day in and day out. That’s why we’ve put together this ultimate guide, packed with expert tips and solutions, to help you take control of your bathroom environment and prevent mold in bathroom fixtures, walls, and ceilings.
Our goal in this guide is to give you practical, tested solutions so you can keep your bathroom fresh, clean, and mold-free. We’ll explain how mold forms, pinpoint the main culprits that cause it to flourish, and share handy prevention strategies. We’ll also cover what to do if you already have mold—offering insights on how to get rid of mold in bathroom areas and how to keep it from coming back. Whether you’re a new homeowner getting acquainted with your space or a seasoned DIY enthusiast, you’ll find valuable tips for preserving the healthiest bathroom environment possible.
Ready to give mold and mildew the boot for good? Let’s dive in and take an in-depth look at what causes mold in bathroom areas, how to tackle it, and how to make sure it never overstays its welcome.
Section 1: Understanding the Problem—What Is Mold and Mildew?
Mold and mildew are two words that homeowners never enjoy hearing—especially when it comes to their bathrooms. These fungal growths are far more than just cosmetic nuisances; they can pose real health concerns and even weaken structural materials if left unchecked. To effectively combat and prevent mold in bathroom spaces, it helps to start with a clear understanding of what mold and mildew actually are, why they thrive in bathrooms, and how their presence can escalate if not tackled promptly.
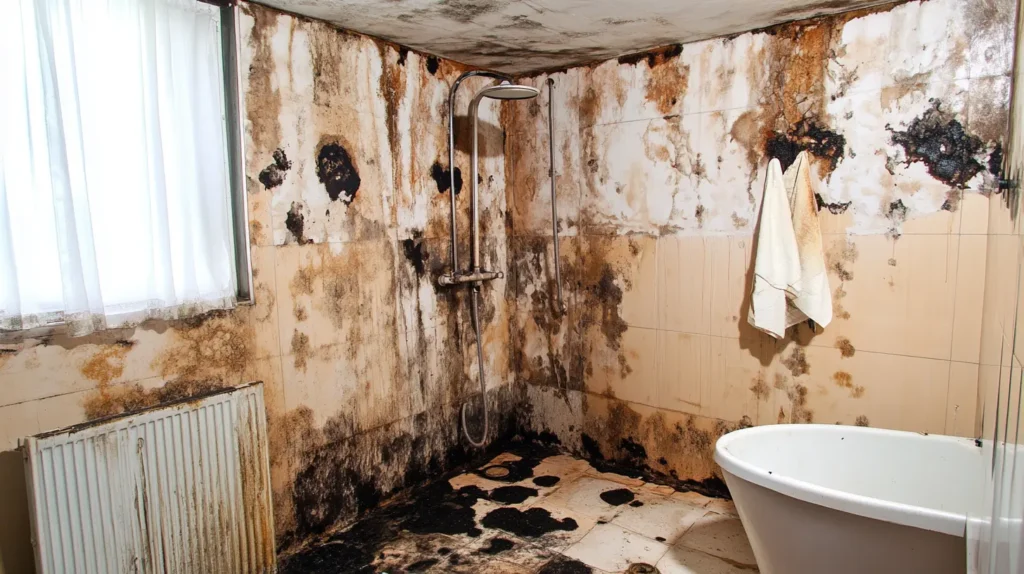
At their core, mold and mildew belong to the same family of fungi. The difference is often a matter of appearance and the stage of growth. Mildew typically starts as grayish or white patches and can darken over time, turning into the black, green, or even brown stains most of us dread. Mold, on the other hand, can appear in various colors—black, green, yellow, or pink. Both mold and mildew have one thing in common: they thrive in consistently damp or humid areas. Unfortunately, bathrooms provide the perfect breeding ground. When you take a hot shower, the steam increases the level of humidity in the air. Without proper ventilation—whether from an exhaust fan or a window—this moist air lingers, settling onto walls, ceilings, grout lines, and shower curtains.
Beyond trapped humidity, bathrooms are full of surfaces that mold spores love. For instance, gypsum-based drywall, the paper backing of wallpaper, and the cellulose within certain paints are all ideal “food sources” for mold. Even tile grout and silicone caulking can support fungal growth if they remain damp over extended periods. In a region like Northeast Florida, the problem is magnified because the ambient humidity is often high year-round, making it difficult for bathroom surfaces to dry out completely between uses.
The presence of mold and mildew shouldn’t be written off as an inevitable nuisance. Mold spores are almost always floating in the air around us, but they only become a major issue when they find a consistently wet or damp surface on which to settle. Once they do, these spores can quickly multiply, leading to issues such as peeling paint, crumbling drywall, and that characteristic musty odor. In severe situations, you might notice mold in bathroom ceiling corners or creeping along the bathroom wall, which can be particularly concerning if there’s a hidden leak supplying a constant stream of moisture.
Fortunately, mold and mildew are neither random nor unstoppable. They need four main factors to thrive: moisture, darkness, warmth, and a food source. By targeting these factors—especially moisture—you can significantly reduce the likelihood of a full-blown infestation. In the upcoming sections, we’ll discuss the most common causes of bathroom mold, offer strategies on how to get rid of mold in bathroom areas, and explain what is best for mold in bathroom prevention. Equipped with this knowledge, you’ll be well on your way to creating a healthier, fresher space for you and your family.
Section 2: Common Causes of Mold in the Bathroom
Understanding why mold and mildew flourish in bathrooms is crucial if you want to keep these unwelcome guests at bay. While it’s easy to assume a bit of scrubbing is enough to address the issue, the reality is that mold forms when certain conditions—primarily moisture, warmth, and organic material—line up perfectly. Below are some of the main culprits behind mold in bathroom areas, along with real-world examples that highlight just how easily mold can take hold when these factors aren’t properly managed.
Excessive Moisture and Steam
Bathrooms are naturally damp environments, thanks to frequent showers and baths. When you step out of a hot shower, the steam raises the humidity in the room, causing water droplets to form on mirrors, walls, and other surfaces. If there’s insufficient ventilation or no immediate way for that moisture to escape, these surfaces can remain wet long after you’ve left the room. Over time, this persistent dampness creates a breeding ground for mold and mildew.
- Real-World Example: Consider a small, enclosed guest bathroom that lacks a window and relies on a weak exhaust fan. After every shower, the walls stay wet for hours, leading to stubborn black spots around the corners of the ceiling and near the shower tiles. Because the moisture never fully dissipates, the mold growth becomes an ongoing battle.
Poor Ventilation
Even if you keep your bathroom spotlessly clean, mold can still thrive if excess humidity doesn’t have a clear exit route. Ventilation is often an afterthought in bathroom design—many people install exhaust fans but fail to maintain them or don’t run them for long enough. Others rely on a single window to circulate air, which can be insufficient in humid climates or for larger bathrooms.
- Real-World Example: Picture a homeowner who switches off the exhaust fan as soon as they exit the shower to save on electricity. Although the fan appears to do its job during the shower, the lingering steam remains trapped once it’s turned off, leading to conditions in which mold can quickly settle on the ceiling, walls, and even on decorative items in the bathroom.
Water Leaks and Plumbing Issues
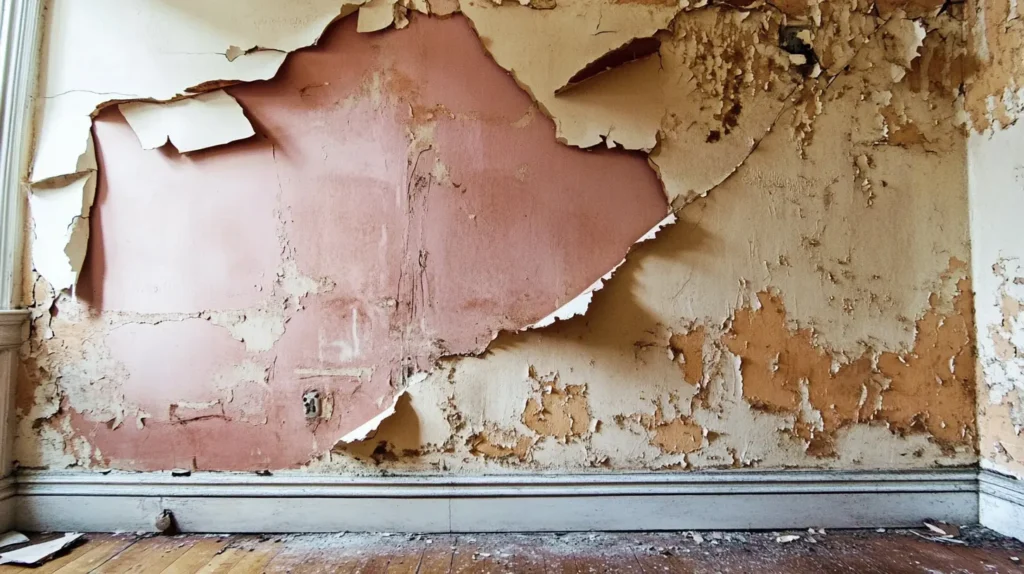
Minor plumbing problems are often overlooked because they might not cause immediate, visible damage. However, a small leak beneath a faucet or behind the walls can go unnoticed for weeks, allowing moisture to accumulate on drywall or subflooring. Because these areas are hidden, mold has the perfect place to grow unseen. By the time homeowners notice peeling paint or a musty smell, a significant colony of mold may already be established.
- Real-World Example: A slow drip behind the bathroom wall might not seem urgent at first. Yet, over time, the drywall becomes saturated, creating a hotspot for mold and mildew. When homeowners finally discover discoloration or soft spots on the wall, they realize the mold problem has been festering out of sight for months.
High Humidity Environment (Especially in Florida)
Northeast Florida is known for its humid climate. When you couple the region’s naturally high humidity with the daily routine of hot showers, you get a hyper-humid environment that can exacerbate mold in bathroom growth. Even if you have a decent ventilation system, high outdoor humidity can make it difficult to keep indoor moisture levels low.
- Real-World Example: Homeowners in St. Augustine or Jacksonville often deal with salt air and year-round humidity. If their air conditioning system isn’t effectively removing excess moisture—or if they frequently open windows for a breeze—condensation can accumulate in bathrooms, fueling the growth of mold around vents, on ceilings, and in corners.
Organic Materials and Porous Surfaces
Mold requires some type of organic material to feed on, which can include drywall, wallpaper adhesive, wooden cabinetry, or even certain types of paint. When moisture seeps into these materials and remains there, mold spores have all they need to multiply. Porous materials, in particular, trap water more easily, making them favorite targets for mold colonies.
- Real-World Example: A bathroom outfitted with stylish wallpaper may look wonderful at first, but if steam penetrates the seams, it can create hidden pockets of moisture. Over time, the paper backing and the paste beneath it become damp, setting the stage for mold growth that isn’t visible until the wallpaper starts to peel or bubble.
By identifying these common triggers—ranging from excess steam to hidden plumbing leaks—you’ve already taken the first big step in combating mold in bathroom spaces. In the following sections, we’ll explore practical, actionable tips for ensuring these problems don’t take hold in your home. From enhanced ventilation to smart material choices, you’ll learn how to tackle the roots of mold growth head-on and keep your bathroom fresh, clean, and healthy.
Section 3: Practical Prevention Strategies—Keep Mold Out for Good
Preventing mold in your bathroom is far more efficient and cost-effective than having to remove it once it has taken root. With the high humidity levels often found in Northeast Florida, you need a well-rounded strategy that addresses multiple risk factors simultaneously. Below, you’ll find a detailed look at several proven methods to stop mold spores from gaining a foothold. By combining these practices, you can maintain a fresher, healthier environment for you and your family—without constantly worrying about discovering new patches of mold.
Upgrade and Use Exhaust Fans
Why It Works: Ventilation is arguably the most critical factor in preventing mold because it allows humid air to exit your bathroom before it settles onto surfaces. A quality exhaust fan specifically rated for your bathroom’s size can make a huge difference. Modern exhaust fans are both energy-efficient and powerful, making them an excellent long-term investment.
Action Step: Run the fan for at least 20 minutes after each shower or bath. Turn it on before you even start running the water so it can begin pulling steam and moisture out of the room immediately. If your exhaust fan is more than a few years old, consider upgrading to a newer model designed for higher airflow. Remember, a fan that’s too small for your bathroom won’t remove enough moisture, potentially allowing mold in bathroom corners and ceilings to develop.
Open Windows and Doors
Why It Works: While not every bathroom has a window, those that do can benefit from a natural cross-breeze. Opening a window—or even just leaving the door ajar—allows fresh air to circulate, thereby reducing humidity levels. This step can be particularly effective during drier months or when the outdoor humidity is not as intense.
Action Step: If the weather cooperates, crack open your window during and after a shower to help release steam. If a window isn’t an option, prop the bathroom door open when possible to encourage air movement. In Florida’s humid climate, you’ll need to balance this with air conditioning usage; running AC can also help lower indoor humidity levels.
Control Humidity with Dehumidifiers
Why It Works: In very humid climates—like much of Northeast Florida—standard ventilation may still leave too much moisture in the air. A small dehumidifier placed in or near your bathroom can help maintain ideal relative humidity levels (generally below 50%), preventing condensation on walls and fixtures.
Action Step: Set a dehumidifier to run periodically, especially after showers or during consistently humid days. Check its water collection tray or reservoir often—overflowing trays can reintroduce moisture into the air, ironically defeating the purpose. Regularly cleaning and maintaining the dehumidifier also ensures it continues to operate at peak efficiency.
Wipe Down Surfaces After Use
Why It Works: Mold thrives on surfaces that remain damp for extended periods. Shower walls, tile grout, and tub edges often stay wet long after the water is turned off. By removing excess moisture, you drastically reduce the chance of spores settling in and multiplying.
Action Step: Keep a squeegee or microfiber cloth within easy reach. Once you’re done showering, quickly run the squeegee over glass doors, tile, and any other wet surfaces. For sinks and countertops, a quick wipe with a microfiber towel will usually suffice. This step takes only a minute or two but can substantially lower the risk of mold formation.
Seal Grout and Fix Cracks
Why It Works: Grout lines and caulking can degrade over time, creating pathways for water to seep behind tiles or into the subfloor. When moisture gets trapped in these hidden areas, mold has the perfect environment to grow unnoticed.
Action Step: Inspect your shower, tub, and sink perimeters at least twice a year. Look for any signs of cracks, discoloration, or missing grout. Re-sealing grout lines with a high-quality sealant or replacing old caulk can block water infiltration. If you notice persistent leaks or damp patches, it may be best to consult a professional, especially if the issue involves potential pipe damage behind walls.
Choose Mold-Resistant Materials
Why It Works: Construction and renovation materials have come a long way, with many now designed specifically to resist mold. Mold-resistant drywall, paints, and caulks contain additives that slow fungal growth, giving homeowners extra time to address moisture issues before they become severe infestations.
Action Step: If you’re renovating your bathroom or constructing a new one, opt for products labeled “mold-resistant” or “moisture-resistant.” While these materials don’t eliminate the need for good ventilation and proper cleaning, they offer valuable protection if moisture does accumulate. Think of them as an added layer of defense, not a substitute for the basics.
These strategies each target a different aspect of what drives mold growth—moisture, poor ventilation, and hidden leaks. No single tip guarantees a mold-free space on its own, but combined, they significantly reduce the risk of an infestation. Should you notice mold rearing its head, stay calm and investigate the underlying issue: it could be anything from a hidden leak to an underpowered exhaust fan. In the next section, we’ll delve deeper into the specific areas where mold frequently hides in the bathroom and discuss how best to tackle each trouble spot.
Section 4: Addressing Mold in the Bathroom Ceiling, Walls, and Other Trouble Spots
Even with diligent prevention strategies in place, mold can sometimes sneak into your bathroom, particularly in older homes or those with underlying structural issues. When you spot a telltale patch of mold or notice a musty odor, it’s essential to act quickly before the problem spreads. Below, we’ll explore the most common problem areas—such as mold in bathroom ceiling, mold in bathroom wall, and a few overlooked spaces—and offer practical solutions to address them.
Mold in the Bathroom Ceiling
Identifying the Problem: Ceilings often accumulate hot, moist air, especially if the bathroom has poor ventilation or a low ceiling. Signs of mold might include tiny black or green dots around light fixtures, air vents, or in corners where moisture tends to collect. In some cases, paint may peel or bubble if water is seeping in from above.
Possible Causes:
- Inadequate Ventilation: An underpowered or malfunctioning exhaust fan allows steam to linger.
- Roof Leaks: If the ceiling is directly below a roof that has cracks or missing shingles, water can penetrate and encourage mold growth.
- Condensation from Poor Insulation: In bathrooms sharing a ceiling with an attic, insufficient insulation can lead to temperature discrepancies that cause moisture to form on cooler surfaces.
Solution:
- Ventilation Check: Assess your exhaust fan’s capacity and ensure it’s venting properly outdoors. If mold on the ceiling keeps reappearing, upgrading to a higher-capacity fan is worth considering.
- Insulate: Proper insulation helps regulate temperature and reduces condensation. Improve or add insulation in attic spaces above the bathroom, paying particular attention to any gaps.
- Clean and Repaint: Remove existing mold with a specialized cleaner or a diluted bleach solution. Once dry, apply a mold-resistant primer and finish with high-quality, moisture-resistant paint.
Mold in the Bathroom Wall
Identifying the Problem: Early signs include peeling paint, brownish or yellowish water stains, bulging or soft drywall, and persistent musty odors. Because walls are often painted or tiled, mold issues behind them may remain hidden until damage becomes extensive.
Possible Causes:
- Hidden Plumbing Leaks: A slow drip behind the wall can go unnoticed for weeks or months.
- Grout and Caulk Failures: Cracks or gaps around tubs and sinks allow water to seep into wall cavities.
- Condensation in Wall Cavities: Especially in humid regions, moisture can build up behind walls if the space is not adequately sealed or ventilated.
Solution:
- Investigate Leaks: If you suspect a hidden leak, contact a qualified plumber—such as our team at Kingdom Based Plumbing—to perform a thorough inspection.
- Remove and Replace Damaged Material: If drywall is waterlogged or moldy, it often needs replacing. Addressing the underlying moisture issue is crucial before installing fresh materials.
- Improve Sealing: Re-grout and re-caulk around fixtures, ensuring no gaps remain for water to infiltrate.
Other Trouble Spots
- Around Windows: Condensation can accumulate on sills in humid climates. Regularly wiping these areas and checking for flaking paint helps prevent mold growth.
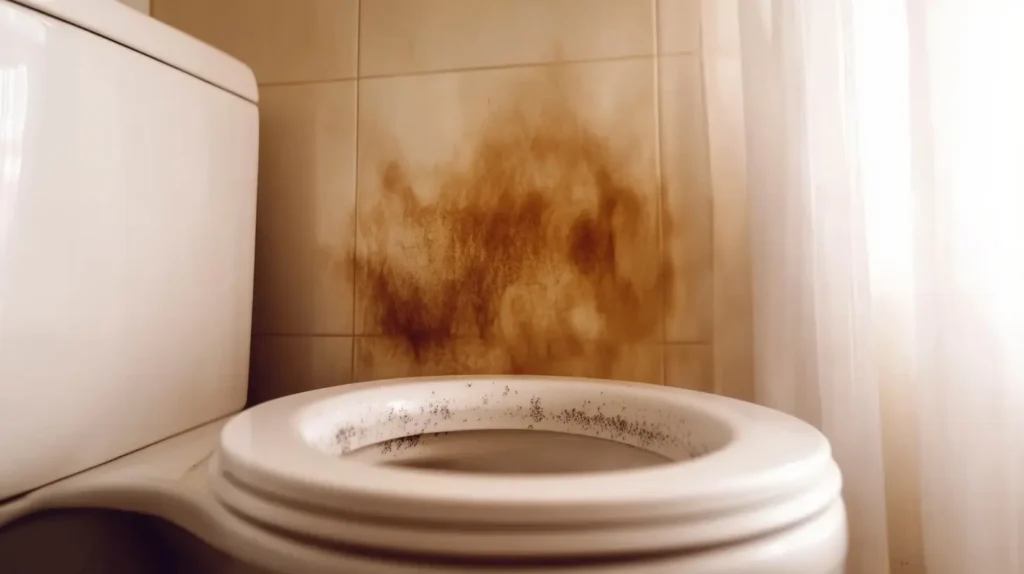
- Behind Toilet Tanks: Condensation on a “sweating” toilet tank can drip behind it, fostering mold along the wall or floor junction.
- Under the Sink: Leaky pipes in enclosed cabinets create dark, damp conditions ideal for mold. Inspect these spaces routinely, keeping them clean and organized.
Final Thoughts
Dealing with mold in your bathroom—be it on the ceiling, the walls, or in hidden corners—doesn’t have to be overwhelming. Prompt action, combined with proper insulation, sealing, and ventilation, can stop a minor patch of mold from escalating into a full-blown infestation. If the scale of the issue seems daunting, don’t hesitate to call in professional help. The key is to act swiftly because the longer mold is allowed to flourish, the more extensive (and expensive) the remediation process can become.
Section 5: Maintenance and Cleanup—Practical Steps for a Mold-Free Bathroom
All the preventive measures in the world won’t amount to much unless they’re backed by consistent upkeep and swift action when moisture issues arise. By keeping your bathroom environment in check, you not only guard against the arrival of mold but also ensure a healthier space for everyone in your home. Below, we delve into a series of maintenance tips and cleaning protocols that can make the difference between a mold-free bathroom and one that becomes a recurring headache.
Routine Inspections
Why It Matters: Even the most vigilant homeowner can miss subtle indicators of trouble, like a small leak under the sink or slight discoloration around the shower base. Yet these minor issues, left untreated, can evolve into significant, expensive problems. Conducting regular inspections helps you catch red flags early—before mold, mildew, and structural damage have a chance to take hold.
Action Step: Set aside time each month to thoroughly scan every inch of your bathroom. Look for water stains, peeling paint, soft or bubbled drywall, and any musty odors that might suggest hidden moisture. Check corners, behind the toilet, under the sink, and around the tub or shower. If you notice something off, investigate further or consult a professional.
Regular Cleaning with Mold-Fighting Products
Why It Matters: Mold spores are microscopic; they can settle on surfaces long before you see visible growth. Regular cleaning ensures these spores don’t have the chance to multiply. Moreover, many household cleaners are specifically formulated to kill mold and mildew, preventing existing spores from finding a hospitable environment.
Action Step: Choose a reliable, mold-killing cleaner or mix your own solution by combining one part vinegar with one part water. Spray or wipe down sinks, tubs, shower walls, and bathroom tile at least once a week. For those who prefer commercial products, look for labels that indicate “mold and mildew remover,” but always perform a spot test first to protect sensitive surfaces. Thoroughly dry the area after cleaning—moisture left behind can undermine your good work.
Targeted Deep Cleans for Grout and Caulk
Why It Matters: Grout and caulk are particularly vulnerable to mold because they’re porous and prone to trapping moisture. Over time, tiny cracks or loose sections of caulk can harbor spores, which can quickly develop into visible mold patches. Thorough, targeted cleanings help eliminate these colonies and discourage new ones from forming.
Action Step: Tackle grout lines by scrubbing them with a stiff brush and a paste made from baking soda and water. Allow it to sit for up to 15 minutes, then rinse with warm water. If the caulk is stained, peeling, or discolored beyond rescue, consider removing and reapplying a mold-resistant product. This step might take more effort initially, but it will save you from bigger headaches down the line.
Address High-Moisture Episodes Immediately
Why It Matters: Bathrooms are notorious for sudden leaks or accidental floods—an overflowing toilet, a burst pipe, or even water splashing out of the tub during a busy morning. Any standing water that remains for more than 48 hours greatly increases the likelihood of mold setting in, sometimes in hidden or hard-to-reach places.
Action Step: At the first sign of a water spill, get to work with towels, fans, or a wet/dry vacuum. If the flood is extensive—such as a burst pipe soaking your floors or walls—consider bringing in professionals. Water restoration experts can ensure your bathroom is thoroughly dried, minimizing the risk of structural damage and mold behind walls or under floorboards.
Opt for Smart Storage Solutions
Why It Matters: A disorganized, cluttered bathroom traps moisture in cabinets and drawers, reducing airflow and creating pockets of humidity. As items accumulate, you may not notice a minor leak or slight water damage lurking behind bottles of shampoo or stacks of towels.
Action Step: Aim for open shelving or wire racks that allow air to circulate. Keep your essentials neatly spaced, and consider incorporating moisture absorbers like silica gel packs or small dehumidifying crystals in tight cabinets. This approach not only helps you stay organized but also reduces the likelihood of mold taking root in overlooked nooks.
A Consistent Routine for a Healthier Bathroom
Think of regular bathroom maintenance as a parallel to routine car checkups—minor, systematic efforts can prevent significant disasters and hefty repair bills in the future. By staying on top of inspections, cleaning diligently, and acting quickly when accidents happen, you’ll create an environment that mold will find inhospitable. Plus, a clean, fresh bathroom adds to the overall comfort and aesthetic appeal of your home, making the extra effort well worth it.
Section 6: A Real-World Case Study—Helping a Local Homeowner Defeat Mold
One of the most rewarding parts of our work at Kingdom Based Plumbing is helping local residents restore comfort and safety in their homes, particularly when it comes to persistent mold problems. In Northeast Florida’s warm and humid climate, it’s not uncommon for mold to develop in bathrooms, even when homeowners do their best to keep things clean and dry. This case study highlights a situation we encountered with Mrs. Smith, a Jacksonville homeowner who discovered that her persistent musty odor was a clear sign of deeper mold issues.
The Problem
Mrs. Smith first reached out to us with concerns about a lingering musty smell in her master bathroom. Initially, she had tried common DIY approaches, such as cleaning with bleach-based products and keeping the door open to air out the space. Despite her efforts, the odor always returned within a day or two. Eventually, she noticed small black dots starting to appear near the ceiling on the bathroom wall—a strong indicator that mold spores were taking root. Concerned about potential health risks and hidden damage, Mrs. Smith asked our team to investigate.
Our Investigation
We began by examining the overall condition of the bathroom. Immediately, we noted that the space felt more humid than average, even hours after Mrs. Smith’s morning shower. A few key diagnostic steps helped us pinpoint the source of the problem:
- Leak Detection: Using moisture meters and thermal imaging, we scanned the walls for signs of active leaks. While none of the plumbing lines appeared to be leaking, the tool registered unusually high moisture levels in the drywall near the upper section of one wall.
- Ventilation Assessment: We then checked the bathroom’s ventilation setup. Mrs. Smith’s existing exhaust fan was neither powerful enough for the bathroom’s square footage nor well-maintained. The vent duct itself was partially obstructed, preventing moisture from venting properly.
- Wall Composition: Finally, we inspected the paint and discovered that standard interior-grade paint had been used. In high-humidity areas, paint that is not moisture-resistant can trap condensation against the surface, allowing mold to flourish.
The Solution
Based on our findings, we proposed a comprehensive plan to tackle the mold and reduce future risk:
- Upgraded Ventilation: We installed a new exhaust fan rated for the bathroom’s size and cleared the ductwork. This improvement alone helped remove steam more effectively, lowering overall moisture levels.
- Mold Remediation: We opened the affected drywall to treat mold at its source. After confirming that the framing behind the wall wasn’t compromised, we applied a fungicide to kill any remaining spores. Replacing the damaged drywall with mold-resistant material added a layer of protection against future outbreaks.
- Painting and Sealing: To further mitigate moisture retention, we primed the repaired area with a mold-resistant primer. We then finished the job with paint specifically formulated for high-humidity environments, ensuring the walls would be less likely to harbor mold.
- Routine Maintenance Plan: Before concluding the project, we spent time with Mrs. Smith, advising her on proper bathroom care. We recommended running the exhaust fan for at least 20 minutes post-shower, periodically inspecting the area for any discoloration or odd smells, and wiping down damp surfaces to prevent excess moisture buildup.
The Results
Within days of the remediation, Mrs. Smith reported that the musty smell disappeared. She was thrilled to notice the bathroom feeling noticeably fresher and drier, even during peak shower times. Over the following weeks, there were no new mold spots or recurring odors, suggesting that the combination of upgraded ventilation, proper sealing, and mold-resistant materials had solved the underlying issue.
Key Takeaway: This case underscores the importance of identifying the actual causes of mold in bathroom spaces. While homeowners often worry about hidden leaks, sometimes the primary culprit is insufficient ventilation and the use of inappropriate materials for high-moisture areas. By conducting a thorough diagnosis and implementing targeted solutions—ranging from enhanced airflow to mold-resistant drywall—you can transform a problem bathroom into a clean and comfortable space.
Conclusion
Preventing mold and mildew in your bathroom involves a combination of knowledge, proactive habits, and the right tools for the job. By controlling moisture, improving ventilation, and using mold-resistant materials where possible, you can keep fungal growth at arm’s length. Should mold appear, a prompt, targeted approach—ideally guided by professional advice—can address the problem before it becomes a costly headache.
As a local, family-run plumbing company serving St. John’s County, Jacksonville, St. Augustine, and nearby communities, Kingdom Based Plumbing understands the unique humidity challenges we face in Northeast Florida. Our hope is that this guide empowers you to take charge of your bathroom environment. Remember, even simple actions like running your fan a bit longer or wiping down surfaces can make a dramatic difference in preventing mold in bathroom areas.
If you ever find yourself battling mold or suspect a hidden leak, don’t hesitate to reach out. We’re here to help you enjoy a healthier, safer home—one well-maintained bathroom at a time.
Frequently Asked Questions
1. How to get rid of mold in bathroom?
To get rid of mold in your bathroom, start by identifying and fixing the source of moisture. That might involve repairing leaks, improving ventilation, or wiping down damp surfaces. Next, clean the moldy area with a specialized mold remover or a DIY solution of vinegar and water. Scrub thoroughly and dry completely. If the mold is embedded in porous materials like drywall or grout, you may need to replace those sections. Finally, take preventive steps such as running your exhaust fan after showers, sealing grout, and using mold-resistant paints to avoid a recurrence.
2. What is best for mold in bathroom?
The best solution for mold in bathroom areas typically involves a multi-step approach:
- Prevent Moisture: Run your bathroom exhaust fan during and after showers, and consider using a dehumidifier in especially humid conditions.
- Choose the Right Products: Use mold-resistant paint, grout sealers, and caulk.
- Effective Cleaners: Vinegar, hydrogen peroxide, and commercially available fungicidal cleaners can effectively kill mold on surfaces.
- Professional Help When Needed: If you suspect a hidden or large-scale infestation, consult a professional plumber or mold remediation service.
3. How to clean mold in bathroom?
For routine cleaning of mold:
- Equip Yourself: Wear gloves, goggles, and possibly a mask, especially if you’re sensitive to mold spores.
- Scrub with a Mold-Killing Cleaner: Vinegar, a bleach solution (one cup of bleach in a gallon of water), or commercial mold removers all work well.
- Rinse and Dry: Wipe away the cleaner and any loosened mold. Make sure everything is fully dry. Mold loves moisture, so drying thoroughly is a crucial step.
- Dispose of Contaminated Materials: If you used any disposable towels or sponges, seal them in a plastic bag and throw them away to avoid spreading spores.
- Maintain a Dry Environment: Run the exhaust fan or open windows to reduce humidity. For stubborn cases, reapply cleaner or consult a professional for deeper issues lurking behind walls or ceilings.


