If you live in Jacksonville, St. Johns, St. Augustine, or anywhere around Northeast Florida, you already know two things: the humidity is undefeated, and water touches nearly everything we do. That means small plumbing issues have a knack for turning into big, wet, wallet-draining problems—especially in our climate. The good news? You don’t need a full remodel to get a safer, more efficient, better-looking plumbing system. With some smart, budget-friendly upgrades (and a few Saturday afternoon projects), you can cut your water and energy bills, reduce leaks and surprises, and actually enjoy your sinks, showers, and fixtures again.
As a local, family-run plumbing company, we’ve seen what works best for homes in our area. Below is a practical, step-by-step guide to the highest-impact, lowest-cost upgrades you can make—many of which you can tackle yourself, and all of which we can do for you if you’d rather skip the crawlspace contortions and the Home Depot scavenger hunt.
1) The Two-Hour Tune-Up: Quick Wins That Pay Off All Year
Before you invest in upgrades, renovations, or shiny new fixtures, it pays to get the fundamentals right. Think of a two-hour tune-up as a preventative health check for your home’s plumbing system. It’s simple, inexpensive, and surprisingly powerful. These quick checks focus on the small, often ignored issues that quietly waste water, drive up utility bills, and eventually turn into emergency repairs if left alone. Best of all, you don’t need to be a professional plumber to do this—just a little time, attention, and curiosity.
Start by gathering a few basics: a flashlight, a towel or paper towels, a small bucket, and a notepad (or your phone). The goal isn’t to fix everything on the spot, but to identify problems early so you can plan smart, affordable solutions.
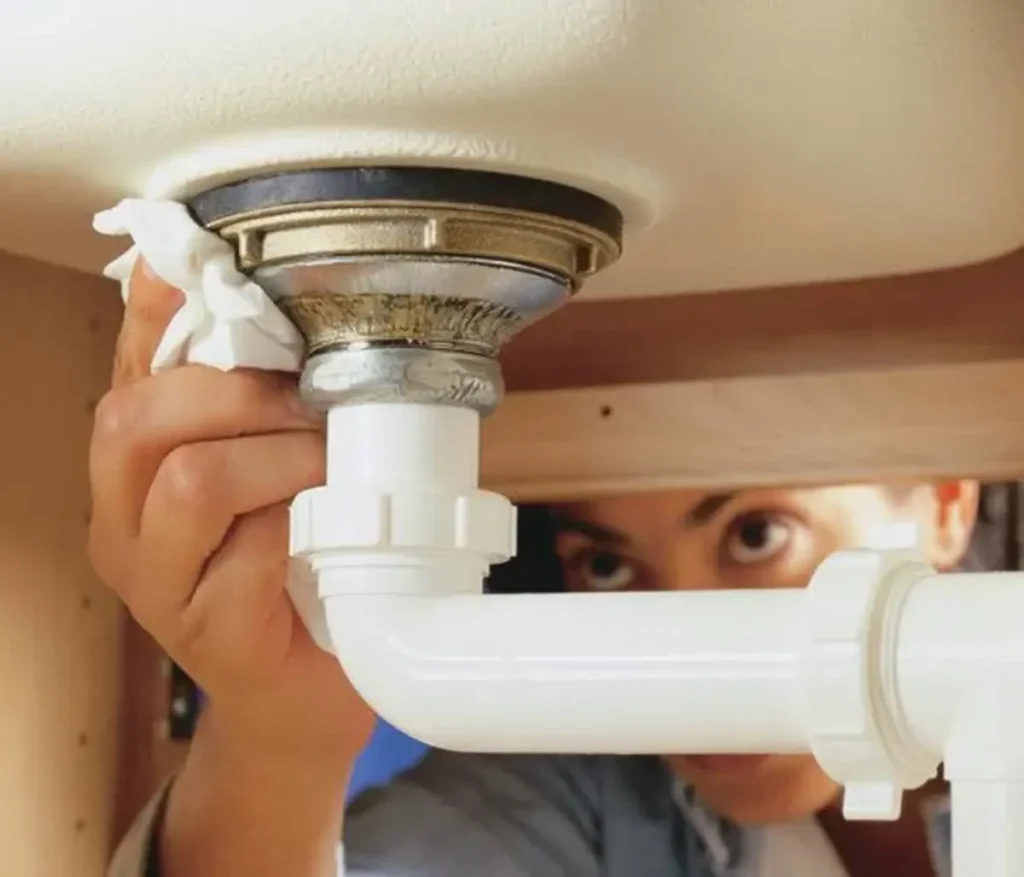
Look Under Every Sink
Begin with kitchens, bathrooms, laundry rooms—anywhere water runs. Open the cabinet and inspect the shutoff valves (also called angle stops) and supply lines. Valves should turn smoothly; if one is stiff, stuck, or hasn’t been touched in years, make a note. In an emergency, a frozen valve is the last thing you want. Check braided supply lines for kinks, corrosion, or fraying—these are common failure points.
Next, place a dry paper towel under the P-trap and run water for a few minutes. Even slow, intermittent drips will show up as dampness. These “micro-leaks” often go unnoticed for months but can cause cabinet damage and mold over time.
Inspect Toilets for Silent Water Loss
Toilets are notorious for wasting water quietly. Remove the tank lid and listen carefully. A faint hissing sound usually means the fill valve isn’t fully shutting off. If the toilet refills itself every few minutes without being used—often called “ghost flushing”—the flapper is likely worn or warped. Both issues are inexpensive fixes, but left alone, they can waste hundreds of gallons of water each month. While you’re there, check for loose bolts or moisture around the base.
Walk the Water Heater
Your water heater deserves regular attention because when it fails, it fails big. Look around the base for rust, corrosion, or moisture. Check the drain pan for standing water and trace any water trails down the tank. Note the unit’s age (usually listed on the manufacturer’s label). If the heater sits in a garage or closet, confirm there’s clear access and that the drain line is properly terminated. If you don’t have a pan alarm or leak detector, add it to your future to-do list—it’s a small investment with major peace-of-mind benefits.
Don’t Forget the Outdoors
Head outside and inspect hose bibs and irrigation connections. Outdoor spigots can drip all day without you ever noticing, especially if they’re behind shrubs or fences. If water leaks from the stem when the spigot is on, try gently tightening the packing nut. If that doesn’t help, plan for a washer or stem repair. These small leaks add up fast on your water bill.
Check the Water Meter
This step is simple but incredibly revealing. Shut off all fixtures and appliances in the house, then watch your water meter. If the small triangle or dial is still moving, you have an active leak somewhere. Catching this early can save hundreds of dollars—especially in areas with sandy soil, where leaks don’t always surface until damage is already done.
Turn Notes Into Action
Once you’ve completed the walk-through, review your notes and prioritize fixes by risk (active leaks first), cost (cheap fixes first), and comfort (items you use daily). In just two hours, you’ll create a clear punch list that delivers real, measurable progress. It’s not flashy—but it’s one of the smartest moves you can make for your home all year long.
2) High-Efficiency Showerheads & Faucet Aerators: Small Parts, Big Savings
If there’s a single upgrade that overperforms for its cost, this is it. Modern low-flow showerheads and faucet aerators are designed to maintain strong, satisfying spray patterns while reducing water usage—perfect for busy households in St. Johns County.
Why it matters: In many homes, showers account for a big chunk of water use. A standard old showerhead can run 2.5–3.5 gallons per minute (GPM) or more. High-efficiency models drop that to 1.5–2.0 GPM with a well-engineered spray that still feels great. For a family that takes five 10-minute showers a day, dropping from 2.5 GPM to 1.75 GPM saves about 37.5 gallons per day—more than 13,000 gallons per year. That also means less hot water, which means lower energy bills and less strain on your water heater.
What to buy: Look for reputable brands with WaterSense labels. For bathroom and kitchen sinks, install 1.0–1.5 GPM aerators; for utility sinks, where a higher volume is desired, 2.0 GPM is suitable. We prefer aerators with removable screens and simple, coin-slot faces, so cleaning takes just seconds.
Pro tips from the field:
- If your water pressure is high (we’ll tackle that later), even a great showerhead can feel harsh. Pair the new head with proper pressure regulation for the best experience.
- Mineral buildup from hard water can clog screens. Unscrew aerators quarterly, soak in white vinegar for an hour, rinse, and reinstall.
- If your shower valve is older, check that the new head’s flow rate still triggers your tankless (if you have one) or keeps the temperature stable. If not, we can add flow-balancing or advise on valve upgrades.
For under $100 total across a couple bathrooms and sinks, you get real savings and a better daily experience. That’s what we call a small hinge swinging a big door.
3) Fix Silent Water Wasters: Flappers, Fill Valves, and Dye Tests
Toilets are the ninjas of water waste: quiet, sneaky, and surprisingly expensive if ignored. A worn flapper doesn’t fully seal the flush valve, so water slowly escapes into the bowl. The fill valve kicks on to top the tank, and you pay for water that never even swirled.
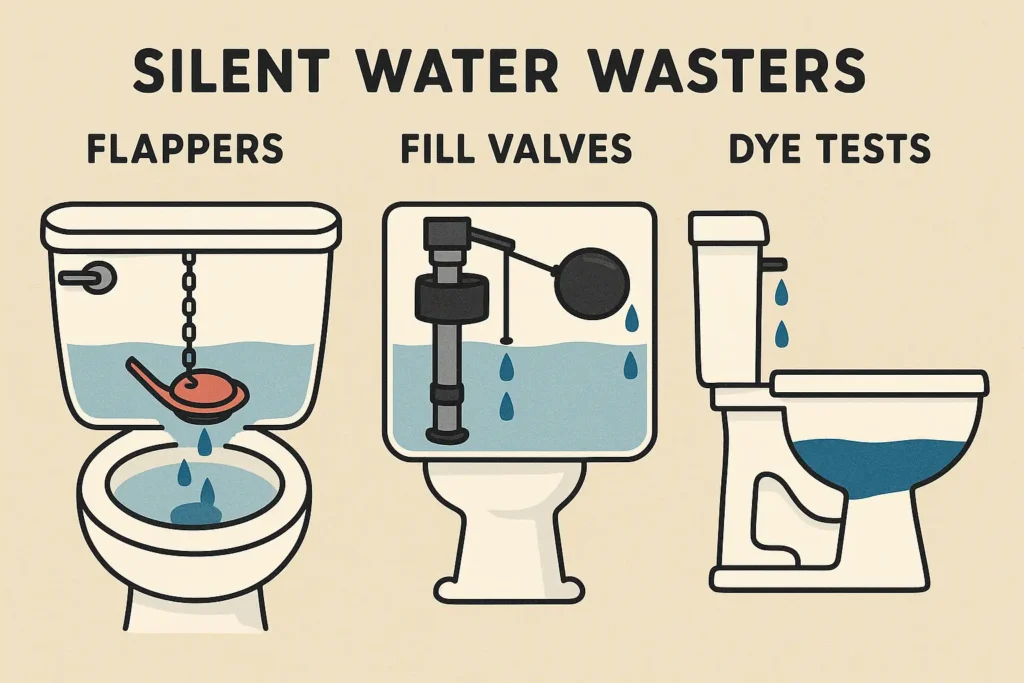
The five-minute test: Put a few drops of food coloring in the toilet tank and wait 10 minutes without flushing. If the bowl water changes color, your flapper is leaking. Nine times out of ten, a new flapper (matched to your brand/model or a universal adjustable) solves it. If your flapper looks good but the toilet “ghost flushes,” the fill valve may be overfilling or the flush valve seat is pitted.
Budget upgrades that actually help:
- Quality flapper matched to the toilet—avoid the ultra-cheap ones that warp quickly in warm, chlorinated water.
- Quiet fill valve with easy height adjustment. Modern designs fill faster and reduce noise—worth every penny.
- Dual-flush conversion kits can work, especially on standard two-piece toilets, but buy a reputable kit and follow instructions carefully to maintain reliable sealing.
Bonus check: While you’re in there, inspect the tank-to-bowl bolts and the supply line. If you see rust streaks or calcification, plan to replace the gasket set and the supply line. If your toilet rocks even a little, it’s an early sign the wax ring may be compromised or the flange is an odd height. A rocking toilet can loosen seals and lead to slow leaks that stain ceilings below. For a budget fix, snug the closet bolts evenly and install plastic shims; for a lasting repair, we can correct flange height and reset the toilet with a better seal.
The bottom line: a $10–$30 flapper/fill kit can save you thousands of gallons per month. That’s not just a budget win—it’s a sanity win.
4) Upgrade Supply Lines and Angle Stops: Quarter-Turn Peace of Mind
OldIf there’s one plumbing upgrade that delivers outsized peace of mind for relatively little money, this is it. Old supply lines and outdated shutoff valves are responsible for countless water damage claims every year—and most homeowners never think about them until something goes wrong. Unfortunately, by the time a supply line bursts or a valve fails, the damage is already done.
Older homes are especially vulnerable because many still rely on vinyl-reinforced or plastic supply lines paired with multi-turn shutoff valves. These valves require several twists to fully close and often haven’t been touched in decades. Add humidity, mineral-heavy water, and occasional salt air (especially in coastal or near-coastal areas), and you’ve got a perfect recipe for deterioration. Rubber dries out. Plastic becomes brittle. Valves seize. Then one day, a “simple” repair turns into a scramble to shut off water that won’t shut off.

Upgrading to stainless braided supply lines and quarter-turn ball valves eliminates most of that risk in one move. Quarter-turn valves open and close with a single, smooth 90-degree turn. No cranking. No guessing. When you need water off now, it’s off—instantly.
Where This Upgrade Matters Most
This isn’t a one-spot fix; it’s a system-wide safety upgrade. Priority locations include:
- Under every sink (both hot and cold lines)
- Behind each toilet, where failures are common and often catastrophic
- Dishwasher connections, especially older copper or plastic feeds
- Refrigerator and ice maker lines, which are notorious for slow leaks that go unnoticed for months
That fridge line deserves special attention. Old plastic tubing is one of the most common causes of overnight kitchen floods. A braided stainless or high-quality polyethylene line rated for potable water is a smart, preventative swap.
What to Choose (and What to Avoid)
Not all parts are created equal. Stick with reputable brands for braided stainless-steel supply lines, and avoid off-brand bargain options. Look for solid construction, quality crimps, and proper certifications for potable water use.
For shutoff valves, choose quarter-turn ball valves with compression fittings rather than push-fit shortcuts. Compression valves, when installed correctly, offer long-term reliability and are easier to service in the future.
Pay close attention to line length, especially for toilets and sinks. A line that’s too short creates tension; one that’s too long can form a tight loop that stresses the connectors. Either scenario increases the risk of premature failure.
DIY or Call a Pro?
If you remove a supply line and the shutoff valve spins freely, shows corrosion, or refuses to loosen from the copper stub-out, that’s your cue to stop. Forcing it can twist or crack the pipe inside the wall—turning a small project into a major repair.
A professional replacement ensures the old valve is removed cleanly, the pipe is properly prepped, and the compression ferrule seats correctly. It also gives you a chance to catch existing seepage before it becomes visible damage.
If you’re comfortable doing it yourself, remember this rule: always use two wrenches. Hold the valve body steady with one while turning the nut with the other to avoid twisting the copper. Once installed, dry everything thoroughly, wrap each joint with a tissue or paper towel, and run water for several minutes. If it stays dry, you’re good to go.
Small Upgrade, Big Protection
This isn’t a glamorous improvement—no one’s showing off their angle stops at a dinner party—but it’s one of the smartest, cheapest ways to drastically lower your home’s plumbing risk. Think of upgraded supply lines and quarter-turn valves as a seatbelt for your plumbing system. You hope you never need them in an emergency, but when you do, you’ll be very glad they’re there.
5) Tame Your Water Pressure: Gauges, PRVs, and the 60 PSI Sweet Spot
High water pressure feels great—until it bursts a line, ruins a faucet cartridge, or makes your water heater relieve valve weep constantly. In many Northeast Florida neighborhoods, static pressure can exceed what your fixtures are happy with, especially at night.
Step one: Buy a simple pressure gauge that screws onto a hose bib or laundry connection. Test pressure when no water is running. Ideal residential range is typically 45–60 PSI. If you’re consistently above 70 PSI, it’s time to act.
Budget-friendly fixes:
- Pressure regulator check or replacement (PRV): If you already have one, it may just need adjustment. If it’s old, replacement is still a relatively low-cost upgrade that protects everything downstream. A properly set PRV reduces leaks and extends fixture life. For most homes, 55–60 PSI hits the comfort and longevity sweet spot.
- Thermal expansion tank check: If you have a PRV and a water heater, you should also have an expansion tank to handle heated water’s expansion. Gently tap it—if it sounds waterlogged or you’re seeing pressure fluctuations, it may need recharging or replacement.
Side benefits: Balanced pressure stops the “water hammer” banging that scares pets and startles guests. It also keeps new low-flow fixtures performing consistently. We install and adjust PRVs all the time; it’s one of those upgrades that quietly pays you back for years.
6) Water Heater Tune-Ups: Efficient, Safe, and Still Budget-Friendly
A full water heater replacement might not be in your budget today, but you can squeeze more efficiency, safety, and life out of your current tank with these affordable upgrades:
- Flush sediment annually: Northeast Florida’s water can leave mineral deposits that settle at the bottom of the tank, causing rumbling and reducing efficiency. A simple flush clears this out. If the drain valve is plastic and stubborn, we’ll use the right technique to avoid breakage.
- Insulate hot water lines near the heater: Foam sleeves on the first 6–10 feet of hot-water piping are cheap, fast, and reduce standby losses.
- Install a pan alarm: If your heater is in an attic or closet, a $15–$30 moisture alarm in the pan can save your drywall and your nerves.
- Check/replace the anode rod: This sacrificial rod protects your tank from corrosion. If yours is mostly gone, replacing it buys time. Consider a segmented anode if you have clearance issues.
- Set temperature smartly: 120°F is usually sufficient for comfort and safety, but if you need hotter water at certain fixtures, we can add a mixing valve so the tank stays hotter while distribution remains safe.
- Add a timer/recirculation control (where applicable): If you have a recirc pump, use a timer to run it during peak times, not 24/7. It’s a small shift that noticeably reduces energy use.
These changes together can make your existing heater feel “newer” without the new-heater price tag.
7) Drainflow and Odor Tune-Ups: Keep It Moving, Keep It Fresh
Slow drains and mystery odors are the house guests no one invited. In our warm climate, organic growth in traps and lines can happen faster, and minor venting issues are more noticeable.
Budget-friendly tactics that work:
- Hair catchers and basket strainers: Put them on every shower/tub and kitchen sink. They’re the $10 superhero cape for your drains.
- Clean the P-traps: If a sink is slow, place a bucket underneath, remove the trap, and clean out sludge. While you’re there, replace worn gaskets so you’re not back under there next month.
- Enzyme treatment (not harsh chemicals): Monthly enzyme-based cleaners help break down organic matter without damaging pipes, especially important for older homes or septic systems.
- Vent basics: If a sink gurgles, the venting may be inadequate or an air admittance valve (AAV) is failing. Replacing a faulty AAV is a modest cost fix that stops siphoning and odors.
Pro checks worth scheduling: If you get recurring clogs in the same line, a camera inspection can reveal belly sags, invasive roots (yes, even here), or grease buildup that needs a proper cleaning strategy. Better to solve the cause than keep buying bottles of disappointment.
8) Small-Dollar Water Quality Upgrades: Clearer, Better-Tasting Water
While whole-home systems can be pricey, there are effective budget options that make a noticeable difference:
- Sediment prefilter at the main (if your layout allows): A simple cartridge housing with a 5–20 micron filter protects fixtures and appliances from sand and grit. In parts of Northeast Florida, this is a quiet hero upgrade.
- Under-sink carbon filter: Install a dedicated drinking water faucet or an inline filter to your existing cold line. Chlorine taste and odor drop dramatically, coffee tastes better, and your family drinks more water.
- Scale prevention cartridges: They’re not full-blown softeners, but certain template-assisted crystallization (TAC) or polyphosphate cartridges can reduce scale adhesion on fixtures. In homes with hard-ish water, this keeps shower doors and aerators cleaner longer.
Care note: Budget filters only help if you replace cartridges on schedule. Put a sticky note on the inside of the cabinet or set a reminder on your phone. Or ask us to add it to your annual maintenance visit—we’ll bring the right cartridge so you don’t play “which filter is this?” in the aisle.
9) Smart Leak Detection on a Budget: Sensors Where It Counts
You don’t need a whole-house smart plumbing system to catch leaks early. Start with standalone battery leak sensors in the highest-risk spots:
- Under the kitchen sink.
- Behind/under the refrigerator if it has an ice maker.
- Under every bathroom sink.
- Next to the water heater pan and in the laundry area.
These compact sensors chirp loudly the second they detect water. Some models connect to Wi-Fi and send phone alerts, but even basic ones are worth their weight in avoided drywall. If you want to step up, add a smart shutoff valve to your main line. It’s not the cheapest item on this list, but the protection is enormous—especially if you travel.
One tip we’ve learned locally: Test your sensors twice a year (a teaspoon of water is enough). Florida humidity doesn’t trip most sensors, but a quick test ensures the batteries and contacts are still doing their job.
10) Outdoor Plumbing Touch-Ups: Hose Bibs, Anti-Siphon, and Light Freeze Prep
Outdoor plumbing gets ignored until it doesn’t. A few small upgrades go a long way:
- Anti-siphon vacuum breakers: These prevent contaminated water from being drawn back into your home’s drinking water. If your hose bibs don’t have them, add screw-on versions. It’s a tiny investment for a big safety boost.
- Hose bib service or replacement: If your spigot leaks at the stem or never quite shuts off, replacing washers/stems or installing a modern frost-free (where layout allows) is worth it. While hard freezes are rare here, frost-free bibs also reduce leak risk by placing the valve seat deeper in the wall.
- Irrigation backflow awareness: Don’t DIY service on backflow preventers—testing is regulated. But do look for leaks or broken heads that can throw money down the driveway every morning.
- Light freeze prep: On the few nights a year we dip near freezing, disconnect hoses, cover exposed taps, and let vulnerable lines trickle. Most years you won’t need it; the years you do, you’ll be happy you remembered.
These upgrades protect water quality, reduce waste, and save you from the frustration of a hose bib that only has two settings: Niagara Falls and drip.
11) Everyday Convenience Upgrades: Feel the Difference Every Time You Wash Your Hands
Not every upgrade is about avoiding disaster. Some are about making daily life smoother:
- Replace faucet cartridges/aerators: A drippy or stiff faucet is often cured by a new cartridge (kitchen and bath). It’s far cheaper than a full faucet replacement and restores smooth operation. Pair it with a fresh aerator for like-new performance.
- Pull-down kitchen sprayer head upgrade: If your sprayer sputters or dribbles, a replacement head can transform your sink experience for a fraction of a new faucet’s cost. Choose one with a magnetic dock or a good weight kit.
- Soap dispenser at the sink: It’s a small thing, but built-in soap dispensers declutter counters and make handwashing pleasant. The refill bottle lives under the sink—no more neon plastic bottle living in every photo you take.
- Garbage disposal swap (when it’s time): Budget disposals do fine until they don’t. A mid-grade, quieter model with better grinding stages reduces clogs and smells. Not the cheapest item here, but a worthwhile quality-of-life upgrade if yours vibrates like a blender full of screws.
These are the kinds of changes guests notice and you enjoy daily. Little delights add up.
12) Cosmetic Refreshers That Punch Above Their Weight: Caulk, Escutcheons, and Trim
You don’t need a new shower valve to get a “new” look. A few well-chosen, low-cost refreshers make bathrooms and kitchens feel cleaner and more modern:
- Re-caulk tubs, showers, and sinks: Old caulk collects mildew and looks tired. Remove thoroughly (take your time), let the area dry, then apply a quality mold-resistant silicone. Smooth it cleanly and give it a full cure. The result is crisp, bright, and sanitary.
- Replace tired escutcheons and flanges: Those little trim rings behind shower arms, tub spouts, and under-sink supplies often rust or discolor first. Swapping them refreshes the whole fixture’s look.
- Shower valve trim-only kits: If your brand/model supports it, a new handle and faceplate can update style without opening the wall. Just be sure the trim kit matches your valve brand/series for proper fit.
- Toilet seat upgrade: Don’t laugh—soft-close, quick-release seats are inexpensive and make cleaning easier. Pair with a fresh wax ring if you’re already pulling the toilet for any reason.
These changes are mostly sweat equity and patience. The payoff is a bathroom that looks cleaner and better cared for—because it is.
13) Safety First: GFCI, Laundry Hoses, and Water Heater Relief
A few safety-focused upgrades are cheap and essential:
- Braided stainless laundry hoses: Rubber hoses can balloon and burst. Upgrading to braided stainless, plus installing easy-to-turn quarter-turn valves, is a must. Consider a simple mechanical auto-shutoff valve that closes if a hose bursts.
- Water heater T&P discharge verification: Make sure the temperature and pressure relief valve pipe terminates properly (typically to a safe drain or outside—not into a pan). If it drips, it’s telling you something; call us to diagnose rather than capping a symptom.
- GFCI where required: Anywhere plumbing and outlets are close friends, you want GFCI protection. That’s an electrical upgrade, but it belongs on the safety checklist because water and electricity are the original odd couple.
Safety items aren’t where you want to be “creative.” If you’re unsure, we’re happy to take a look and make it right.
14) DIY vs. Call-a-Pro: Know When to Holster the Wrench
We’re pro-DIY when it makes sense—and we’re also pro “don’t flood your kitchen.” Here’s a quick rubric:
Great DIY candidates:
- Replacing faucet aerators and showerheads.
- Swapping toilet flappers/fill valves and doing dye tests.
- Installing under-sink leak sensors and water heater pan alarms.
- Re-caulking and cosmetic trim replacements.
- Replacing braided supply lines and simple angle stops (if corrosion is minimal and you have the right tools).
Best left to pros (or at least call us first):
- Pressure regulator installation/adjustment when you’re not confident.
- Water heater anode replacement if clearance is tight or the nipple is seized.
- Any work near the main shutoff or meter.
- Gas water heater venting or gas line work (permits and safety standards apply).
- Persistent drain issues that keep coming back—this is where camera inspections pay for themselves.
Permits and local norms: Northeast Florida has specific codes for backflow, venting, and water heater installs. Even budget upgrades need to respect those lines. If you’re on the fence, we’ll tell you straight whether it’s DIY-friendly or worth a quick service call.
15) Prioritize Like a Pro: A Weekend Plan and Real-World Budgets
If you’re aiming for maximum impact with minimal spend, here’s a practical way to stage your upgrades over two or three weekends:
Weekend 1 – Stop the leaks and waste
- Two-hour tune-up walkthrough and meter check.
- Replace any suspect supply lines and angle stops (toilets and sinks first).
- Toilet repairs: flappers and fill valves where needed.
- Install leak sensors at the water heater and under the kitchen sink.
Weekend 2 – Efficiency and comfort
- Swap showerheads and aerators.
- Install a basic sediment or under-sink carbon filter.
- Insulate hot-water lines near the tank; flush the tank if overdue.
- Re-caulk one bathroom thoroughly.
Weekend 3 – Pressure and polish
- Test static pressure. If high, schedule a PRV adjustment/replace.
- Replace tired escutcheons and trim where rust is visible.
- Add vacuum breakers to hose bibs and service outdoor spigots.
Budget ranges (ballpark, parts-only):
- Aerators and showerheads: $20–$120 depending on quantity/quality.
- Toilet flapper/fill kits: $10–$40 per toilet.
- Braided supply lines and quarter-turn stops: $15–$60 per fixture.
- Leak sensors: $10–$40 each.
- Sediment or under-sink carbon filter: $40–$150.
- Pipe insulation (foam sleeves): $10–$30 for near-heater runs.
- Caulk and removal tools: $10–$30.
- Pressure gauge: $10–$20.
- PRV (if needed): parts $75–$200, plus labor if we install.
Actual costs vary by brand and your home’s layout, but even at the higher end, this is still “budget” compared to water damage or a full remodel. And the impact—lower bills, fewer headaches, cleaner look—is immediate.
16) Northeast Florida Considerations: Climate, Water, and Local Quirks
Our region has a personality. A few local factors shape which budget upgrades matter most:
- Humidity and warmth: Mold loves damp caulk and slow leaks. Re-caulking and leak sensors punch above their weight here.
- Sandy soils and slab homes: Slab leaks can be sneaky. Keep an eye on meter movement and soft spots in flooring. Early detection saves money.
- Mineral content: Not the worst in the country, but enough to justify regular aerator cleaning, water heater flushing, and considering simple filtration.
- Storm season: Know where your main shutoff is. If you evacuate, consider closing it, especially if you have older supply lines. A smart shutoff valve is a strong storm-prep add if your budget allows.
- Backflow and irrigation norms: Our local utilities take cross-connection seriously (as they should). Don’t bypass or “get creative” with those devices—call us if you see leaks or oddities.
Planning with these realities in mind ensures your budget goes toward upgrades that truly matter for a Jacksonville or St. Augustine home—not a one-size-fits-nowhere checklist.
17) Frequently Asked “Is It Worth It?” Scenarios
“My showerhead works. Why change it?”
Because today’s efficient heads deliver great feel with less water and energy. The annual savings almost always pay for the upgrade within a year or two, and you’ll probably like your shower more.
“Do leak sensors really help?”
Yes. A $20 sensor catching a supply line drip on day one beats discovering a swollen cabinet and a rotting subfloor six months from now.
“My toilet runs once a day. Is that a big deal?”
Maybe not today, but it’s constantly wasting water. The fix is cheap and quick, and it lowers your bill immediately.
“Is a PRV just for fancy houses?”
No. Pressure regulation protects all homes. High pressure is hard on everything—hoses, ice maker lines, faucets, washing machine solenoids. Set it right and forget it.
“Can I push water heater replacement five more years?”
Maybe. Keep it safe with regular flushes, a healthy anode, proper T&P discharge, and a pan alarm. But once rust or frequent leaks start, save your money and plan for a replacement—the limbo phase can get expensive fast.
18) When to Call Kingdom Based Plumbing
You don’t need to do this alone. Here’s where our local team shines for budget-minded homeowners:
- Whole-home checkup: We’ll perform a guided tune-up, make on-the-spot repairs (with your approval), and leave you with a prioritized list tailored to your house.
- Pressure and protection: We diagnose pressure issues, set PRVs, verify expansion tanks, and install smart shutoffs on the main if you want a technology assist.
- Water heater TLC: From safe flushes to anode inspection and leak alarms, we extend your heater’s life and keep it code-compliant.
- Honest advice: If a part is fine, we’ll say so. If a mid-price option does the job, we won’t upsell the fancy chrome trophy unless you ask for it.
We’re neighbors. We live with the same humidity, the same storm season, and the same sandy soil. That’s why our recommendations are practical—and why our customer list looks like a Northeast Florida map.
19) Your Budget Upgrade Blueprint (Recap)
If you only remember one thing, make it this: start where the water can hurt you most, then improve the fixtures you touch every day.
- Stop leaks and secure lines: Braided supply lines, quarter-turn valves, toilet flappers, and fill valves.
- Dial in pressure: Test it. If it’s high, adjust or replace the PRV; verify expansion control.
- Boost efficiency and comfort: Low-flow showerheads, new aerators, water heater insulation and flush.
- Enhance safety: Leak sensors, water heater pan alarms, proper T&P discharge, braided laundry hoses.
- Freshen appearance and function: Caulk, trim kits, escutcheons, sprayer heads.
- Outdoor basics: Vacuum breakers, hose bib service, quick freeze prep on rare cold nights.
- Water quality: Sediment and carbon filters where they make the biggest daily difference.
Work this list over a couple weekends, and your home will feel tighter, quieter, and more efficient—without a renovation loan.
20) Ready for a Hand?
At Kingdom Based Plumbing, we love helping our neighbors make smart, affordable upgrades that actually move the needle. Whether you want a quick pressure check, a toilet that finally behaves, or a whole-home walkthrough with prioritized fixes, we’re here for it. We service St. John’s County, Jacksonville, St. Augustine, and the surrounding areas—and we treat your home like it’s ours.
Give us a call, and let’s turn your budget into real improvements you’ll notice every single day. Your future self, your water bill, and your floors will thank you.


